First, I need to go back a bit to catch up.....
These two pieces I created last week for my FineArtsATCsOnetoOne yahoo group. The first is a watercolor of a Cyprus lined road in Tuscany and the second is Faery Door II, a special trade creation, done in pen & ink, watercolors, and acrylics.


Yesterday, I was finally able to get back into my creative groove and spend some time on challenges. The first one is my entry for the last ARTchix bi-weekly lotto on the Yahoo group. The theme is Pick 3 (colors). I chose Blue, Pink, and Green. The little girl fairy, the eggs piece, text, and the magnifying glass are all ARTchix Studio images. I arranged them on lime green cardstock, stamped and embossed a flourish, used colored pencil, added a paper flower which I highlighted with Smooch Accent Inks, and I used Tim Holtz Linen Distress Pad to age the whole thing a bit.

Another group I really enjoy is Art For The Creative Mind. Tolegranny (TG), our fearless leader, provides varied and plentiful challenges and swaps. This group really pushes me to stretch my creative muscles and I love it!
This weekend TG issued a fun challenge to create anything using embossing supplies, no rules, no guidelines, no expectations, just use what you have. Now, I have many powders, a heat gun, stamps and pads, and pens that I have really only begun to explore so having this opportunity to experiment and play was thrilling. In fact, I had so much fun I couldn't stop with just one, or two, or even three. I did FOUR. All very different and all new things I haven't tried before.

Embossed Artist
Supplies: glossy white ATC card
Alcohol Inks - Rust, Red Pepper, Bottle, Sunbright Yellow, Eggplant, Denim, and Silver Metallic Mixative
Tim Holtz ATC stamp - The Artist
can of air/dust remover
black stamp pad
black embossing powder
heat gun
The background technique, called Alcohol Ink Splatter came from Tim Holtz's new book A Compendium of Curiosities. You simply drop a dot of alcohol ink onto the glossy paper then quickly blow it with your can of air and wallah you get this cool splatter effect. Caution: this does take some practice so try it out on scrap paper first until you get the hang of it. Tim advises to know when to say when on this....it can become a real mess very quickly.
Then ink up your stamp, stamp over the splatters, sprinkle with embossing powder, heat and you are done. Unless, of course you want to add other embellishments!

Embossed Deco
Supplies: glossy white ATC card
Alcohol Inks -Red Pepper, Denim, Eggplant
Stamp - Art Deco
black stamp pad
Embossing Powder - black
Acrylic Craft Paint - Vanilla or Cream
heat gun
paper towel
The background technique, called Alcohol Ink Monoprint, came from Tim Holtz's new book A Compendium of Curiosities. Basically, you drip and/or scribble alcohol inks onto a craft sheet, shake on some blending solution and swipe your paper (glossy side down) through the ink. Then re-swipe going in a different direction. Again, I caution you to experiment with this technique as this also takes practice.
I then coated my deco stamp with black ink, stamped it onto the background, and embossed with black powder and allowed to cool. Next, I diluted a small dab of Vanilla craft paint with blending solution so that it was nice and watery and brushed it just over the stamped area. Then quickly wiped it off with a damp paper towel and allowed it to dry. I then squirted a dab of Tiara Stickles onto my craft sheet and using my finger "painted" it onto the borders around the stamped area and allowed that to dry. For, the finishing touch I squeezed a line of Black Diamond Stickles around the edges of the stamped area to frame it off.

Embossed Owl
Supplies: glossy white ATC card
Alcohol Inks - Bottle (green), Denim, Sunbright Yellow, Silver Metallic Mixative
Stamps - Owl, flourishes or branches
Stamp Pad - embossing pad
Embossing Powder - bright blue and copper
Smooch Accent Inks - Ocean Soul, Luscious Lime, Moonlight, Tuxedo Black, Molasses, Gold Lame
heat gun
The background technique, called Alcohol Ink Monoprint, came from Tim Holtz's new book A Compendium of Curiosities. Basically, you drip and/or scribble alcohol inks onto a craft sheet, shake on some blending solution and swipe your paper (glossy side down) through the ink. Then re-swipe going in a different direction. Again, I caution you to experiment with this technique as this also takes practice.
I then coated my Owl stamp with embossing ink pad, stamped it onto the background, and embossed with bright blue powder and allowed to cool. I repeated with process twice with a branch stamp and copper powder. Using Smooch Accent Inks I colored in and highlight the owl and the leaves on the branches.
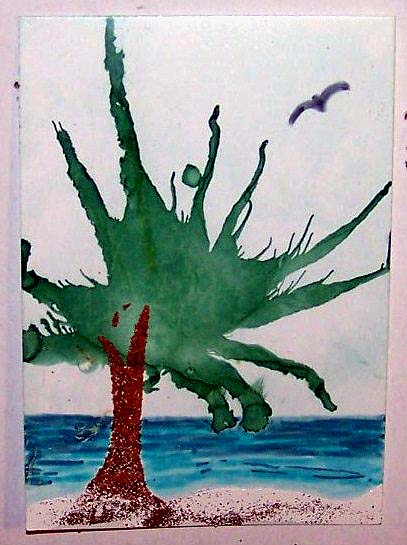
Embossed Palm
Supplies: glossy white ATC card
Alcohol Inks - Bottle (green)
Stamps - Tree (only use trunk)
Stamp Pad - embossing pad and pale blue
Embossing Pen - Brush
Embossing Powder - brown, cream, and gold
Martha Stewart Dye Ink Craft Markers - Indigo, Turquoise, Cornflower, Sepia, Pewter
heat gun
blending tool
can of air
To create the background I used Tim Holtz's blending tool to pick up color from the soft blue stamp pad then using a swirling motion I applied color from the outside edge inward. This created a soft sky with clouds look.
I created the Palm tree using the Alcohol Ink Splatter technique I shared above. The trunk was created by using an embossing pen and only wetting the trunk part of the tree stamp. I used brown embossing powder and the Sepia craft marker to give the trunk texture and definition.
I then drew the sand area with the embossing pen and sprinkled it with a very light dusting of gold and then a good amount of cream and applied the heat tool. Using the two colors gave some dimension to the sand.
The water is simply a combination of the blue markers with the darkest one being most prominent in the back and the lightest being the most prominent in the front. A stylized V in pewter marker creates the seagull.
Next time I promise not to write such a long post!
I hope you enjoyed and found inspiration in these techniques. No go create something!
Oooh! I LOVE that owl! You are so creative and you know I just adore all the things that you do! My other favorites are the palm tree and the little fairy girl.
ReplyDelete